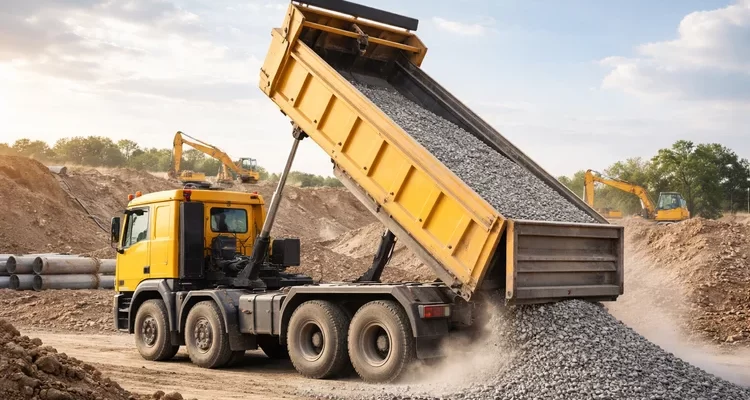
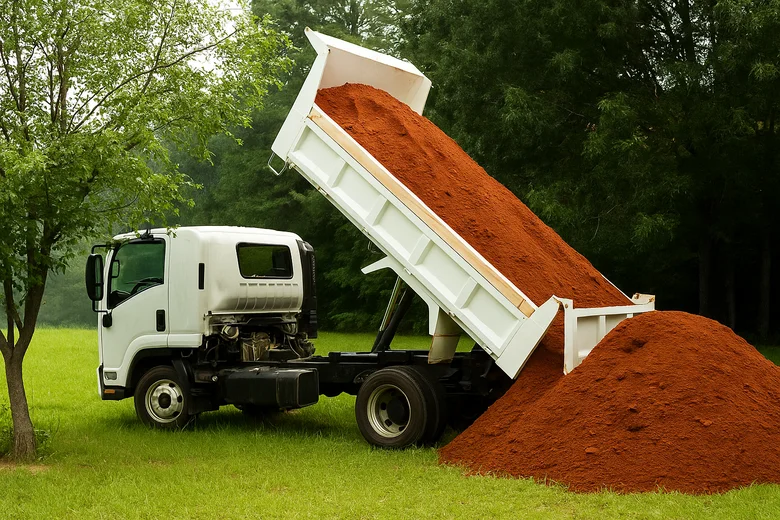
Getting landscaping supplies delivered by a tipper truck is one of the fastest, most efficient ways to move bulk material for garden makeovers, pool backfill, paving, or civil work. But a smooth delivery requires a bit of planning.
Below we walk you through why driveway preparation matters and give practical, step-by-step tips to ensure safe, damage-free, on-time unloading of soil, sand, gravel and other landscaping material. We draw on practical hire experience (we use 9-tonne Isuzu tippers in our fleet) so the advice matches what drivers expect on-site.
Why Driveway Preparation Matters
A tipper truck delivery is more than just “dump and go.” The delivery process affects your driveway, access roads, and the materials themselves. If the site isn’t prepared you risk:
- Damage to the driveway or lawn from heavy wheel loads or turning radius.
- Unnecessary delays while the driver waits for access to be cleared.
- Safety incidents from people or pets near the unloading zone.
- Wet or contaminated material when materials are dumped without protection.
Preparing the site preserves your property, avoids additional haulage or re-delivery fees, and helps your project stay on schedule — especially for large-volume, bulk deliveries used in landscaping, pool fill, or civil work.
Tip 1: Know Your Driveway’s Load Capacity
Before the truck arrives, confirm the ground can take a heavy vehicle. Most hire tipper trucks used for landscaping are rated for several tonnes. Check:
- Surface type: concrete and asphalt are ideal; compacted gravel can work; soft turf or garden beds are risky.
- Weight-bearing capacity: older driveways or paved sections over voids (e.g., under a deck) may not be safe.
- Turning and drop-off radius: ensure the truck can maneuver and dump in the required location without jack-knifing or reversing repeatedly.
If you’re unsure, choose a short, firm drop zone away from sensitive landscaping and structures or contact your truck hire company ahead of time to confirm suitability.
Tip 2: Mark the Drop Zone Clearly
A clear, designated unloading area saves time and prevents damage.
- Use flags, cones, or high-visibility tape to create a visible drop-off area.
- Decide whether to have the truck dump in one large pile or spread material across a specific area for immediate workability.
- Communicate the exact location to the truck driver — include gate codes or parking instructions when you confirm the booking.
A marked zone also helps establish safe zones where workers stand during unloading and reduces the chance of accidents from low-hanging branches, wires, or stray debris.
Tip 3: Lay Down Plywood or Boards
Protecting surfaces is simple and effective.
- Lay plywood sheets or timber boards where the tipper will drive and dump — this spreads the wheel load and prevents rutting.
- For grass or soft ground, consider timber trackways or heavy-duty mats.
- Remember to protect footpaths, pipes, posts, and garden edging near the drop zone.
If materials will be dumped close to delicate landscaping (plants, irrigation heads, paving), a protective layer can save costly repairs later.
Tip 4: Ensure Accessibility
Check the full route the truck will use — not just the driveway entrance.
- Remove loose rocks, branches, debris, or other obstacles from the path so the truck can maneuver comfortably.
- Check for low-hanging branches or power lines that could obstruct the truck’s tipping operation.
- Confirm gates and access roads are wide enough for a tipper and that there is sufficient turning radius.
- If access roads are narrow or sloping, discuss alternatives with the hire company — sometimes a smaller truck or different drop point is recommended.
Tip 5: Consider the Weather
Weather has a big influence on delivery success.
- Heavy rain can turn work areas into mud, reducing traction and increasing the risk the truck will get stuck.
- Use tarps to protect materials from getting wet if rain is forecast — wet soil and sand are heavier and harder to spread.
- If the forecast looks bad, talk to the hire company about rescheduling or confirming that the driver can still access the site safely.
A little forward planning — checking the forecast and protecting the drop zone — saves you a lot of extra work on a wet day.
Tip 6: Have a Plan for Moving Materials
Once the tipper dumps, you’ll have to move and spread materials.
- Decide ahead of time who will spread the material (contractor, landscape team, or homeowner).
- Arrange equipment: rakes, shovels, wheelbarrows, a mini-loader or bobcat if you need to move bulk material quickly.
- For backfill material used around pools or foundations, plan compaction and layers so that the dumped material can be used immediately.
Communicate the plan with the driver — they may be able to help position the piles for easiest access and dispersal.
Practical Pre-Delivery Checklist
Below is a quick checklist to print or share with your crew before a tipper truck arrives.
| Task | Action |
| Site cleared | Remove debris, rocks, branches and check for low-hanging obstructions. |
| Ground protection | Lay plywood/boards or mats on soft surfaces. |
| Drop zone marked | Mark pile location, spread vs single pile decision. |
| Access checked | Gate widths, turning radius and approach roads verified. |
| Safety plan | Establish designated zones, PPE (vests, gloves, helmets) for workers. |
| Weather check | Confirm forecast; arrange tarp if wet weather expected. |
| Moving plan | Tools and equipment ready: wheelbarrow, rake, bobcat or loader. |
| Communication | Provide driver with site map, gate codes and contact number. |
Safety Measures During Unloading
Safety is essential. Make sure to:
- Keep all workers and bystanders in a designated safe zone well clear of the tipping area.
- Use high-visibility vests, gloves and helmets as required for the job. These simple personal protective equipment measures reduce injuries if a pile shifts unexpectedly.
- Avoid standing behind the truck during the tipping process — materials can displace and throw loose items unpredictably.
- Confirm that the driver understands the unloading plan and there are no wires or obstructions that might impede the tipper.
Managing Different Materials
Different landscape materials require different handling:
- Soil / Topsoil — can be compacted when wet; tarp if rain is expected; spread promptly for even drying.
- Sand / Bedding sand — avoids contamination; keep tarped and covered; light but spreads easily.
- Gravel / Drainage rock — heavier to move; consider positioning piles close to the work area to reduce double-handling.
- Backfill / Fill for pool — requires careful layering and compaction; place in accessible piles for compactors.
Plan accordingly so that material is delivered in a condition you can use immediately.
Extra Tips & Common Issues
- Confirm volume and truck type: double check the total volume you ordered so the truck has sufficient space to dump the entire delivery (avoids partial deliveries and delays).
- Protect delicate features: set up temporary barriers around water features, posts, and newly planted beds.
- Keep pets and children away during delivery — it’s a busy, heavy operation.
- Have a rain plan: if wet hire or haulage is affected by weather, the hire company can advise on alternatives.
- Communication is key: call to confirm the driver’s arrival time and alert them if anything on-site changes.
Book a Tipper Truck for Your Next Landscaping Job
At CJS Machinery Hire, we’re not just another hire company. We’re local, family-run, and proud to serve the Hervey Bay and Maryborough areas with over 25 years of hands-on experience. You can pick up the vehicle for free, or we can drop it off and collect it for just $180. All we need is your license, credit card, and a valid machinery ticket.
Don’t let your landscaping project grind to a halt. Whether you’re moving mulch, cleaning up waste, or levelling out soil—CJS Machinery Hire’s 9T tipper truck is ready to go when you are.
 Call us today for a free quote or advice on the best gear for your job.
 Servicing Hervey Bay, Maryborough, and all areas within 100km.
Related Posts
Post a Comment